
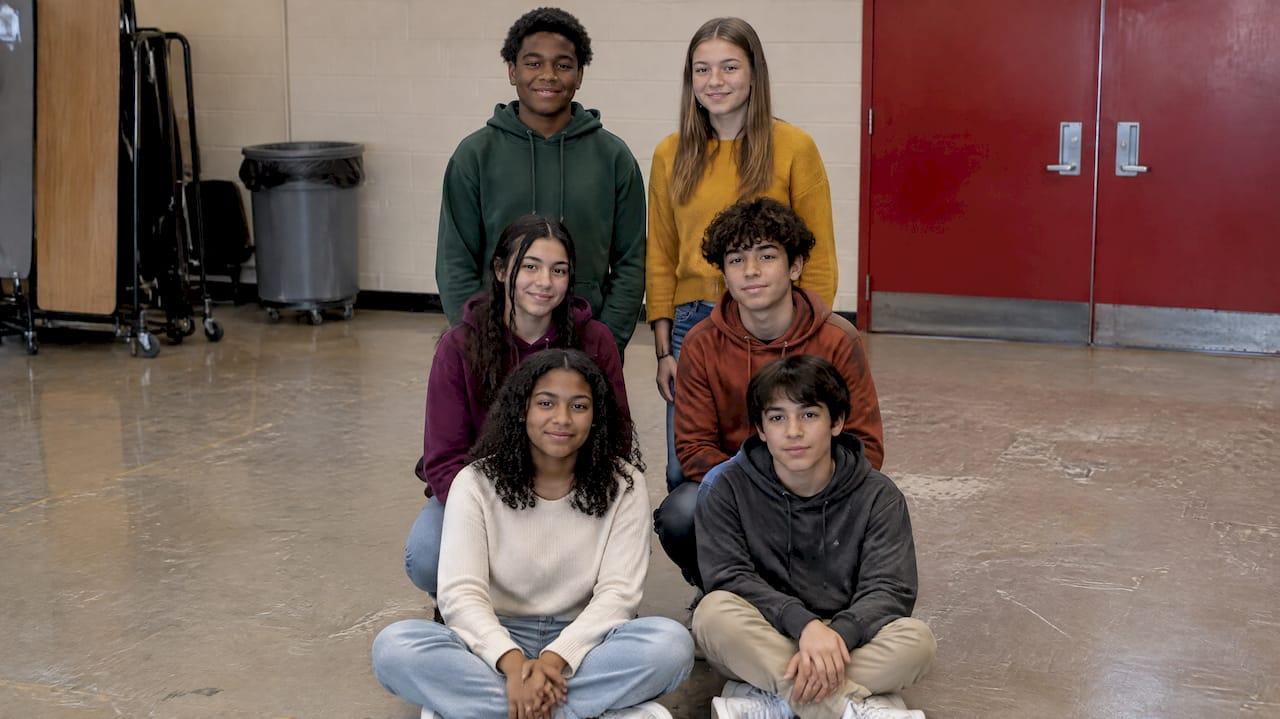
A yearbook group photo has one job: every person in it must be visible and identifiable on a printed page. The arrangement that does this is a staggered, slightly curved set of rows, with the shortest people in front, each row higher than the one before, and every face sitting in the gap between two faces below it. The rest is planning by group size, a camera set slightly above eye level, and a prep routine that keeps picture day moving. Once the photos are done, we make sure they land on the page at a size where those faces can still be read.
TL;DR
- Stagger faces into the gaps between heads in the row in front, and raise each row above the one before it.
- Match the layout to group size: two rows for roughly 10 to 30 people, risers or steps for 30 to 100, and a high vantage point beyond that.
- Put the camera slightly above eye level, use moderate focal lengths, and shoot many frames because someone will blink.
- Count people yourself, line them up by height before the photographer is ready, and have a labeled ID sheet ready.
- Plan page space before picture day so the group is not shrunk into an unreadable strip.
Table of Contents
- What a yearbook group photo is for
- The core arrangement: rows, height and staggering
- Layouts by group size
- Camera position and settings
- Prepare before picture day
- Where group photos go wrong
- Plan the page before you shoot
- From the risers to the printed page
- FAQ
- Sources
What a yearbook group photo is for
A candid can be artistic. A formal group shot is a record. An ERIC yearbook photography document from 1973 makes the point that the chief purpose of a formal group shot is to show all members for easy identification. If faces are hidden or the background is busy, the picture fails at its job.
That standard still works for advisers today. Before you pick a pose, ask a simple question: could a sophomore find their friend in this picture at the size it will print? Everything below serves that test.
The core arrangement: rows, height and staggering
For groups of about ten up to several hundred, the HSM University group portrait lesson describes structured rows. The front row is seated, a standing row sits behind it, and any further rows go on steps, benches, risers or a slope. Each row has to be higher than the one in front.
Three rules do most of the work:
- Stagger the faces. Each person's face should appear in the gap between the two people in front of them. Nobody's head should sit directly behind another head.
- Raise every row. If the back row is not elevated, those students become shoulders and hairlines.
- Curve the rows slightly toward the camera. The same lesson recommends a gentle arc so the people at the ends are about as far from the lens as the people in the middle. That helps both focus and lighting.
Height order
The usual rule is shortest students seated or kneeling in front and tallest standing in back. A class photo guide from Rapid Focus Media adds a few practical details. Leave a few centimeters of even space between students so nobody hides behind a shoulder. Place teachers at one end or the center of the back row rather than the exact middle. Keep hands relaxed at the sides or loosely clasped rather than tightly crossed.
The even and odd trick
Staggering is easier when row counts alternate between even and odd. Behind the Shutter's high-volume system uses a sitting front row, a kneeling second row and a standing third row. For 21 people that works out to 6, 7 and 8. Because the counts differ by one, every person in a row naturally lands in a gap between two people below.

Count the group yourself. A team posing guide from Zenfolio advises counting people rather than trusting a roster to decide how many rows you need. Rosters are often out of date by picture day.
A worked example: 28 students in a club photo
Say your yearbook club has 28 members and a teacher adviser.
- Front row, seated on chairs: 9 of the shortest students.
- Middle row, standing on the floor behind them: 10 students, each between two seated faces.
- Back row, on a bench or the bottom risers: 9 of the tallest students, again between two faces in front.
- The adviser stands at the end of the back row, not dead center.
That is three rows, no head behind another, and an arc of a few degrees toward the camera. If the back row's faces still disappear, raise the back row one more step rather than asking people to lean.
Layouts by group size
The size of the group changes the approach. The same HSM lesson lays out a size-by-size progression, and the ERIC document and other photographers' guides add detail.
| Group size | Layout | Notes |
|---|---|---|
| 2 to 3 | Close, overlapping, varied heights | Heads at different levels |
| 4 to 8 | Triangles and diamonds, mix of seated and standing | Avoid a straight line of heads at one height |
| 10 to 30 | Two or three staggered rows with a slight arc | The everyday club or class layout |
| 30 to 100 | Multiple rows on steps or risers, camera elevated | Bleachers and stage steps work well |
| 100+ | Stands, bleachers or a high vantage point, wide lens or panorama | Faces will be small; plan the page for it |
A few notes on the edges of that table.
Small groups. The ERIC document says informal posing is fine for groups of no more than 10 to 15, and that small groups look better casual and relaxed than arranged in elaborate V shapes or circles. For two to six people, varying head heights to form triangles and diamonds makes the picture feel connected, while a straight line of heads looks static.
Large groups. The same ERIC document recommends not photographing more than 25 to 40 people in a single group. If your marching band or senior class is larger, split it by section, grade or homeroom and run several frames. You will get larger faces and a cleaner page layout.
Props and background. Basic group shots work better without large tables or desks, and with a crop that cuts feet, legs and background so faces stay large. Pick a plain background and keep the same backdrop, distance and focal length across groups so pages look consistent side by side.
Adjusting for age
With elementary students, the front row is where you need to be specific. Zenfolio gives age-based front-row poses: cross-legged on the floor for ages six and under, both knees down with hands behind the back for middle groups, and one knee up with the other leg straight for older students. Whatever you choose, tell students once and demonstrate it, since younger children copy what they see. Our elementary yearbook planning guide covers the wider schedule for younger grades.
Camera position and settings
You can arrange a group perfectly and still lose the picture to the lens.
- Height. HSM University recommends a camera slightly above eye level, looking slightly down, for most groups. A step ladder is an essential accessory in that lesson. The slight downward angle separates the rows and keeps chins from being hidden.
- Focal length. The same lesson suggests 35 to 85 mm on a full-frame camera, from far enough away to keep natural proportions. It warns that wide-angle lenses stretch people at the edges of the frame. Digital Photography School advises 50 mm or longer, typically 100 to 150 mm, if you can stand back far enough.
- Frames. Dig into the numbers: HSM notes that in a group of ten, a blink somewhere in any frame is likely, and in a group of thirty it is almost certain. Take several frames in short bursts after a count, and check faces at full magnification. Digital Photography School suggests at least 10 to 15 frames after warning the group, while keeping up a conversation.
A simple trick from the HSM lesson: ask the group to close their eyes and open them on a count of three. It takes seconds and cuts down on half-blinks.
Prepare before picture day
Most failed group photos fail in the ten minutes before the camera comes up. A short routine fixes that.
- Confirm the list. Have a class roll or club roster ready for additions and absences, and decide in advance whether a teacher or aide is in the shot.
- Send a one-page note to coaches and club sponsors. It should cover uniform or dress expectations, anything to bring, where to meet and when to arrive, and a plan for bad weather. Our yearbook photography checklist for school coordinators goes through the whole day in order.
- Pick the spot early. Find steps, risers, a stage or bleachers ahead of time, and check the background for exit signs, trash cans and bright windows.
- Use a helper. Rapid Focus Media notes that having a staff member arrange students while the photographer sets up the camera roughly halves the time per group. Zenfolio suggests a helper lining students up tallest to shortest during the last individual shots, so the team is already sorted when the photographer turns around.
- Prepare an ID sheet. The ERIC document recommends passing a properly labeled ID sheet along the rows from left to right immediately after the picture is taken. Names collected on the spot are far more accurate than names reconstructed in April.
The ERIC material and the studio guides all agree on the underlying principle: arranging the group is a seconds-long step if the preparation is done, and a twenty-minute argument if it is not.
Where group photos go wrong
- Hidden faces in the back row. Fix it with a higher platform or a more staggered pattern, not by asking people to squeeze together.
- Wide-angle distortion. Students at the edges look stretched. Step back and use a longer lens.
- One blink ruins the frame. Shoot a burst, and check at full magnification before the group disperses.
- Mismatched framing across the book. Different distances and backdrops make the spread look patchwork. Keep distance, backdrop and focal length the same where you can.
- No names. If no ID sheet was passed along, you will be hunting for identifications at deadline.
Plan the page before you shoot
A well-arranged group of 35 faces still becomes unreadable if the page gives it a two-inch strip. Decide how much room each group gets before picture day, and shoot with that crop in mind: wide for a full spread, tighter for a half page. Our adviser playbook on preventing postage stamp photos on class pages shows how to size photos so faces remain large, and our guide to yearbook candid photo types helps you balance posed groups with candid shots on the same pages.
If a group is too large to read at one size, split it. A senior class by homeroom, a band by section, a team by position group. The pages come out cleaner and every student can find themselves.
Our perspective
Advisers tell us the same thing: the photo session is where the book is won or lost, because nothing in layout can rescue a hidden face. We built TrailMark around the idea that schools should not have to fight the production side while they manage the photo side. Instant all-inclusive pricing online, with no signup and no sales pitch, means you know what the book costs before you decide how many group pages you can afford.
Because we have no order deadlines and a 2 to 3 week turnaround, you can shoot a late spring team or club and still get it into the book. Our free design assistance and the flexibility to design in Canva, InDesign or our online creator mean the arrangement you worked hard to get on the risers is the arrangement that prints. Our team brings more than 50 years of combined experience to that work, and we take the same school-first approach with a first-year adviser as with a veteran.
Our advice: arrange the group for faces, size the page for faces, and let us handle the production.
Jace
From the risers to the printed page
Once your group photos are arranged and shot, the page is where they pay off. TrailMark produces yearbooks for elementary, middle and high schools, with instant all-inclusive pricing online, shipping included, no signup and no hidden fees. Turnaround is 2 to 3 weeks, and there are no order deadlines, so a spring sports team or a late club photo can still make the book. You can design in Canva, Adobe InDesign or our online creator, and design assistance is free.

If you want to see how the book comes together, get your school's instant yearbook pricing. Hard cover and softcover options and extras such as printed endsheets, spot UV and personalized covers are listed on our printing options page, where a perfect bound soft cover is $1.60 per book and a 150 point board hard cover is $1.50 per book. If you want to hand over the design as well, our full-service option is described on our middle school and K-8 page. To plan quantities, our yearbook quantity ordering checklist helps.
FAQ
How many people should be in one yearbook group photo?
The 1973 ERIC yearbook document recommends not photographing more than 25 to 40 people in one group. Beyond that, faces get small and rows get long. Split large groups by grade, homeroom, section or position, and take a separate frame for each.
Should the tallest students stand in the middle or at the back?
Put the tallest at the back and the shortest in front, then stagger so each face sits in the gap between two people below. For sports teams, Zenfolio suggests building a pyramid out from the center with the tallest in the middle. For a standard class or club photo, height from front to back is the simpler rule.
What camera height and lens work best?
Start slightly above eye level, looking slightly down, from far enough back to use a moderate focal length. HSM University suggests 35 to 85 mm on full frame and warns that wide-angle lenses stretch people at the edges. Digital Photography School recommends 50 mm or longer, often 100 to 150 mm.
How do I keep people from blinking in the final photo?
Take many frames. In a group of thirty, a blink in any single frame is almost certain, so shoot a burst after a count and check at full magnification. Asking everyone to close their eyes and open them on three also helps.
Does the arrangement change for younger students?
Yes, mainly in the front row. Zenfolio suggests cross-legged seating for ages six and under, both knees down with hands behind the back for middle groups, and one knee up for older students. Keep the staggered rows and the height order the same.
Sources
- Group portraits, PHOT-220 Lesson 9, HSM University
- ERIC yearbook photography document ED091696
- High-Volume Photography, Behind the Shutter
- How to Pose Groups for Portrait Photography, Digital Photography School
- How to Pose Sports Team Photos, Zenfolio
- Class & Group Photos, Rapid Focus Media